Unattended installations
Unattended mode and response files
Section titled “Unattended mode and response files”In case you want to fully automate the installation of jvmguard, you can pass the argument-q to the installer. This
makes the installer run in unattended mode. To set the installation directory, pass the argument -dir [installation directory]:
./jvmguard_installer.sh -q -dir /opt/jvmguardTo apply user input from a previous GUI or console installation, locate the response file .install4j/response.varfile
in the installation directory and pass it to the installer with the argument -varfile response.varfile. The response
file is a plain text file, and the contained property definitions can be changed in a text editor. Settings that are
otherwise contained in config/application.yaml will not be picked up from the response file. To modify them, you have
to use the server configuration mechanism detailed below.
Automatic server configuration
Section titled “Automatic server configuration”In a cloud environment, you might want to recycle an instance or set up scripts that initialize a new instance with a completely configured jvmguard installation. To help you with that task, the jvmguard installer tries to read a number of optional configuration files with special names from the same directory.
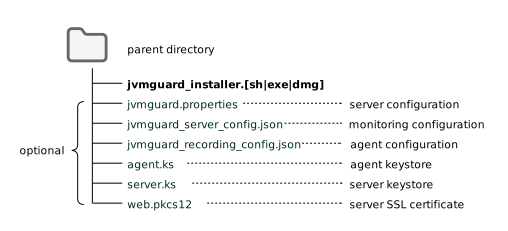
Each of those files is explained in the following sections.
Server configuration
Section titled “Server configuration”To adjust values in config/application.yaml, copy an application.yaml file from a configured installation into the
same directory as the installer.
The installer will use the data in that file for the initial values. You can trim the contents of the file to the keys that deviate from the defaults, the installer will supply the default values for all other options. It does not matter if you delete comments or change the order of keys. Extra keys that are not present in the default file are merged in at the end.
Monitoring configuration
Section titled “Monitoring configuration”The monitoring configuration includes everything you can adjust in the jvmguard UI. Open the general settings in a
configured installation, select the “Export/Import” tab and click on “Export configuration”. This will save the entire
server configuration to a file. If you rename that file to jvmguard_server_config.json and put it
into the same directory as the installer, the installer will automatically apply this configuration in the new
installation.
Agent configuration
Section titled “Agent configuration”The monitoring configuration in the previous section includes the configuration for the agent. However, there is one case where you might want to supply a separate agent configuration: When the jvmguard agent connects to a jvmguard server for the first time, it receives its configuration from the server and, as a consequence, some classes have to be reinstrumented for monitoring.
If your policy is to avoid all class retransformations, you can specify that on the “Options” step of the VM group configuration. In that case, any configuration change will only be applied when the monitored VM is restarted. To avoid the need for a restart in an unattended deployment, the configuration for the agent can be imported in advance.
First, you have to open the recording settings and export the VM group configurations of interest.
Then, rename the exported file to jvmguard_recording_config.json and place it next to the installer. The installer will
perform the import for agents that are running on the local machine. For other machines, you have to perform this import
yourself by calling
java -jar jvmguard.jar import jvmguard_recording_config.jsonThe agent extracts its config from that file and writes it in binary form to the directory
$HOME/.jvmguard/config.
This directory is read by all agents on the local machine.
Note that these steps are only necessary if you want to avoid class retransformations. Otherwise all configuration changes are applied on the fly.
Agent and server keystores
Section titled “Agent and server keystores”You can encrypt and authenticate the communication between monitored VMs and the jvmguard
server. The files agent.ks and server.ks constitute a key pair that enables both encryption as well as mutual
authentication.
For an unattended deployment, you will probably already be using a particular key pair with your monitored VMs. In a
configured jvmguard installation you can find these files in the ssl directory below the data directory. Placing them
next to the installer ensures that they are copied to the same location in the new installation and that the server does
not generate a new key pair.
Server SSL certificate
Section titled “Server SSL certificate”It is recommended to use SSL to encrypt the communication between the jvmguard UI server
and browsers. If you enable SSL during the installation, a self-signed SSL certificate is generated and saved to
ssl/web.pkcs12 in the jvmguard data directory. You can replace that file with a certificate that is signed by a
well-known certificate authority.
If you have such a certificate, you can put it next to the installer with the name web.pkcs12. No self-signed
certificate will be generated in that case.